




Key Takeaways
- macOS can directly configure IKEv2, L2TP over IPSec, and Cisco IPSec connections.
- For most users, changing the protocol inside a VPN app is the easiest option.
- OpenVPN, WireGuard, and other unsupported protocols require compatible software rather than just macOS settings.
- If you're unsure which protocol to choose, Auto is usually the simplest starting point.
How to Enable Custom VPN Protocols on Mac: 3 Methods
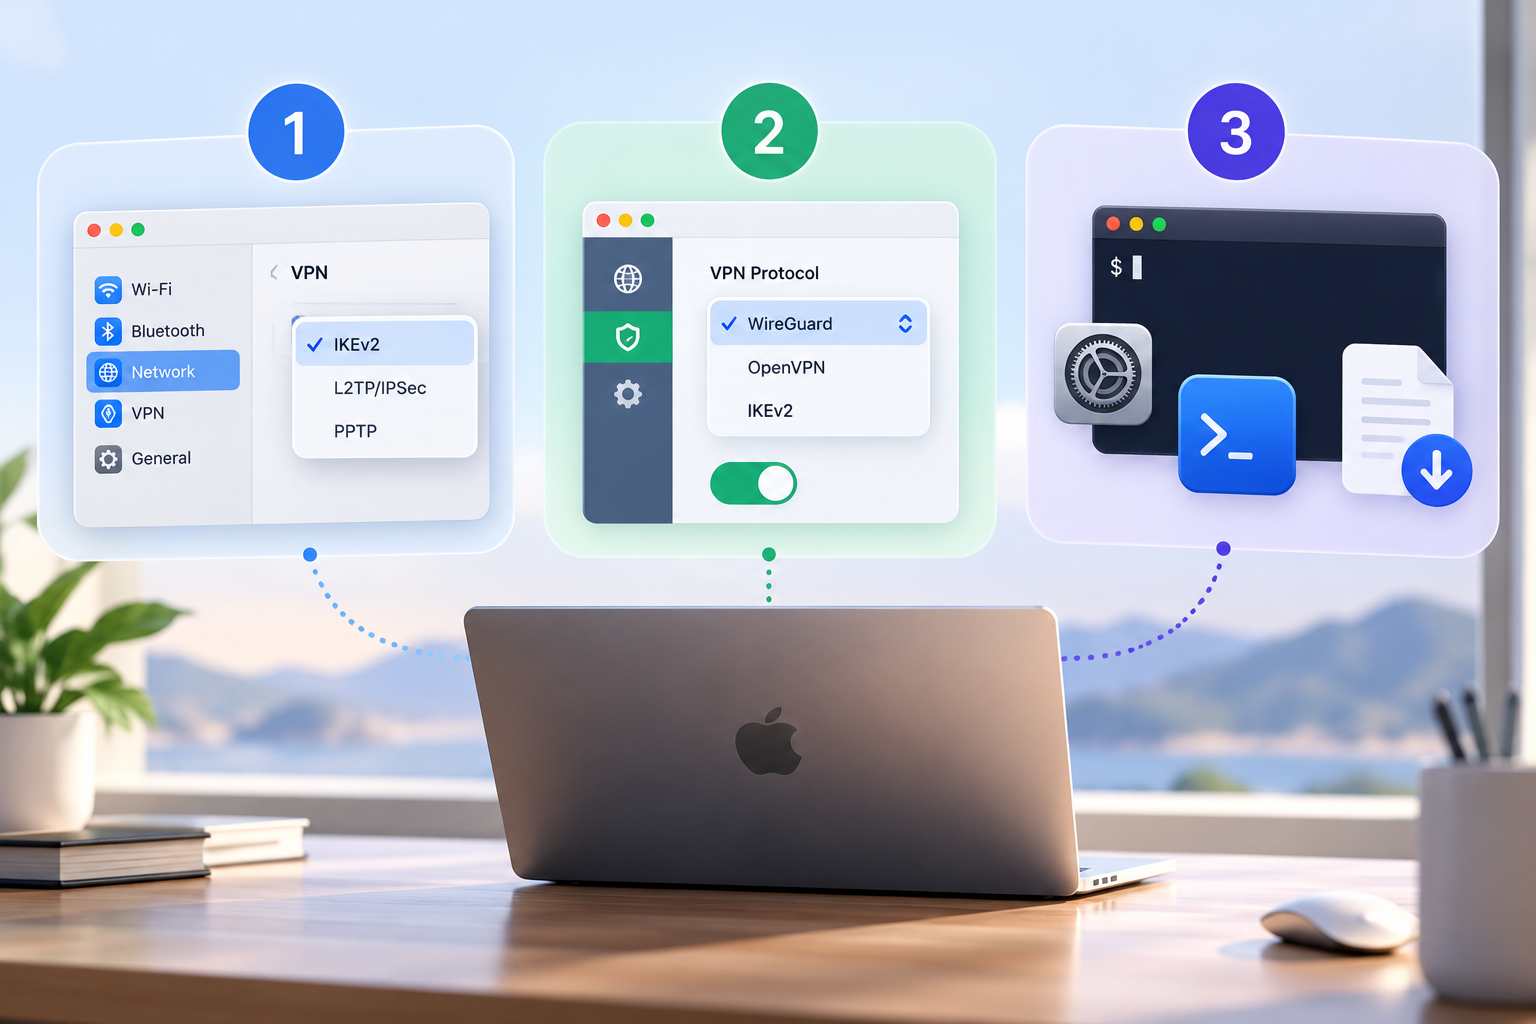
There are three practical ways to enable or change a VPN protocol on Mac.
Method 1: If macOS already supports the protocol, you can configure the VPN server directly in System Settings.
Method 2: If you use a commercial VPN service, you can usually change the protocol inside its Mac app. This is the easiest method because the app handles the server, authentication, and protocol configuration for you.
Method 3: If macOS does not natively support the protocol you need, such as OpenVPN or WireGuard, you'll need a compatible client, command-line implementation, or provider-specific software.
Which method you should use depends mainly on whether macOS already knows how to handle that protocol.
Method 1: Set Up a Supported VPN Protocol on Mac
If your VPN server uses a protocol macOS already supports, you don't necessarily need a separate VPN application. You can create the VPN connection directly from macOS.
Which VPN Protocols Does macOS Support Natively?
In the current macOS VPN configuration menu, Apple provides three main connection types:
- IKEv2
- L2TP over IPSec
- Cisco IPSec
Apple's current Mac setup documentation lists these options under Add VPN Configuration. This means you can create, for example, several different IKEv2 connections using different servers. But you can't enter an OpenVPN server into this menu and make macOS treat it as an OpenVPN connection.
What You Need Before Setting Up the VPN
Before manually creating the VPN connection, get the required configuration from your VPN provider, company IT team, or server administrator. Depending on the protocol, this may include the server address, account name, password, authentication method, certificate, shared secret, or Remote ID.
How to Add a VPN Protocol Configuration on Mac
To configure one of the supported VPN types:
1. Open Apple menu > System Settings > Network.
2. Open the Action menu and choose Add VPN Configuration.
3. Select IKEv2, L2TP over IPSec, or Cisco IPSec.
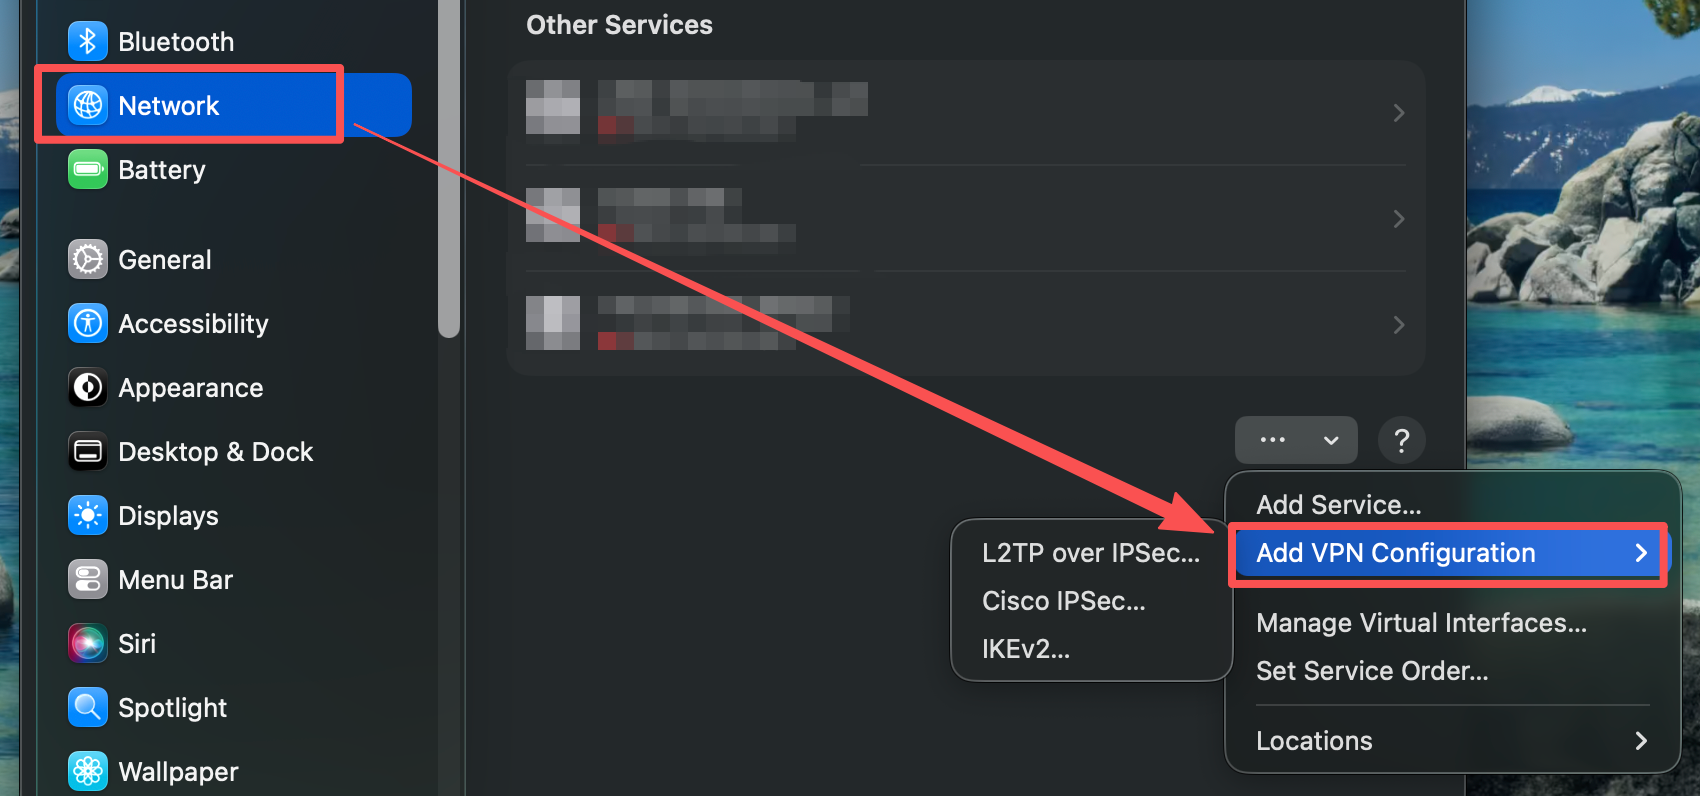
4. Give the VPN connection a display name.
5. Enter the server address, account, and required authentication details.
6. Add any certificates, IDs, or other settings required by your VPN.
7. Click Create, then connect to the VPN.
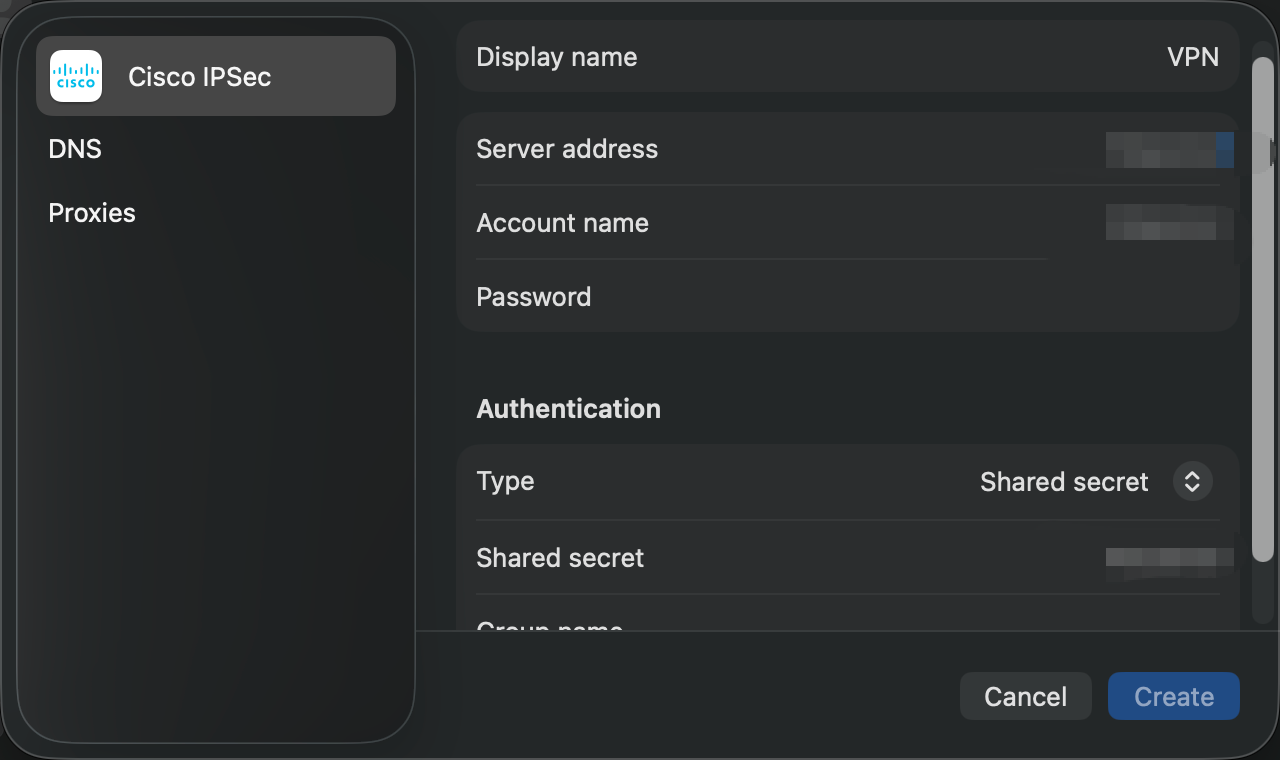
8. This follows Apple's current manual VPN configuration process.
If you're using a normal consumer VPN service, manually entering all of these settings is often unnecessary. Changing the protocol directly inside the VPN app like UFO VPN is usually much easier.
Method 2: Change VPN Protocols in a Mac VPN App — Easiest Way
Many VPN apps use an automatic setting by default. Instead of making you decide which protocol to use every time, the app selects a suitable connection method based on its own settings and your current network. If you have a specific requirement for speed or compatibility, you can change it manually.
Different VPN apps place this control in slightly different locations. Below, we'll use UFO VPN for Mac as an example of how to customize the VPN protocol.
How to Change the VPN Protocol in UFO VPN on Mac
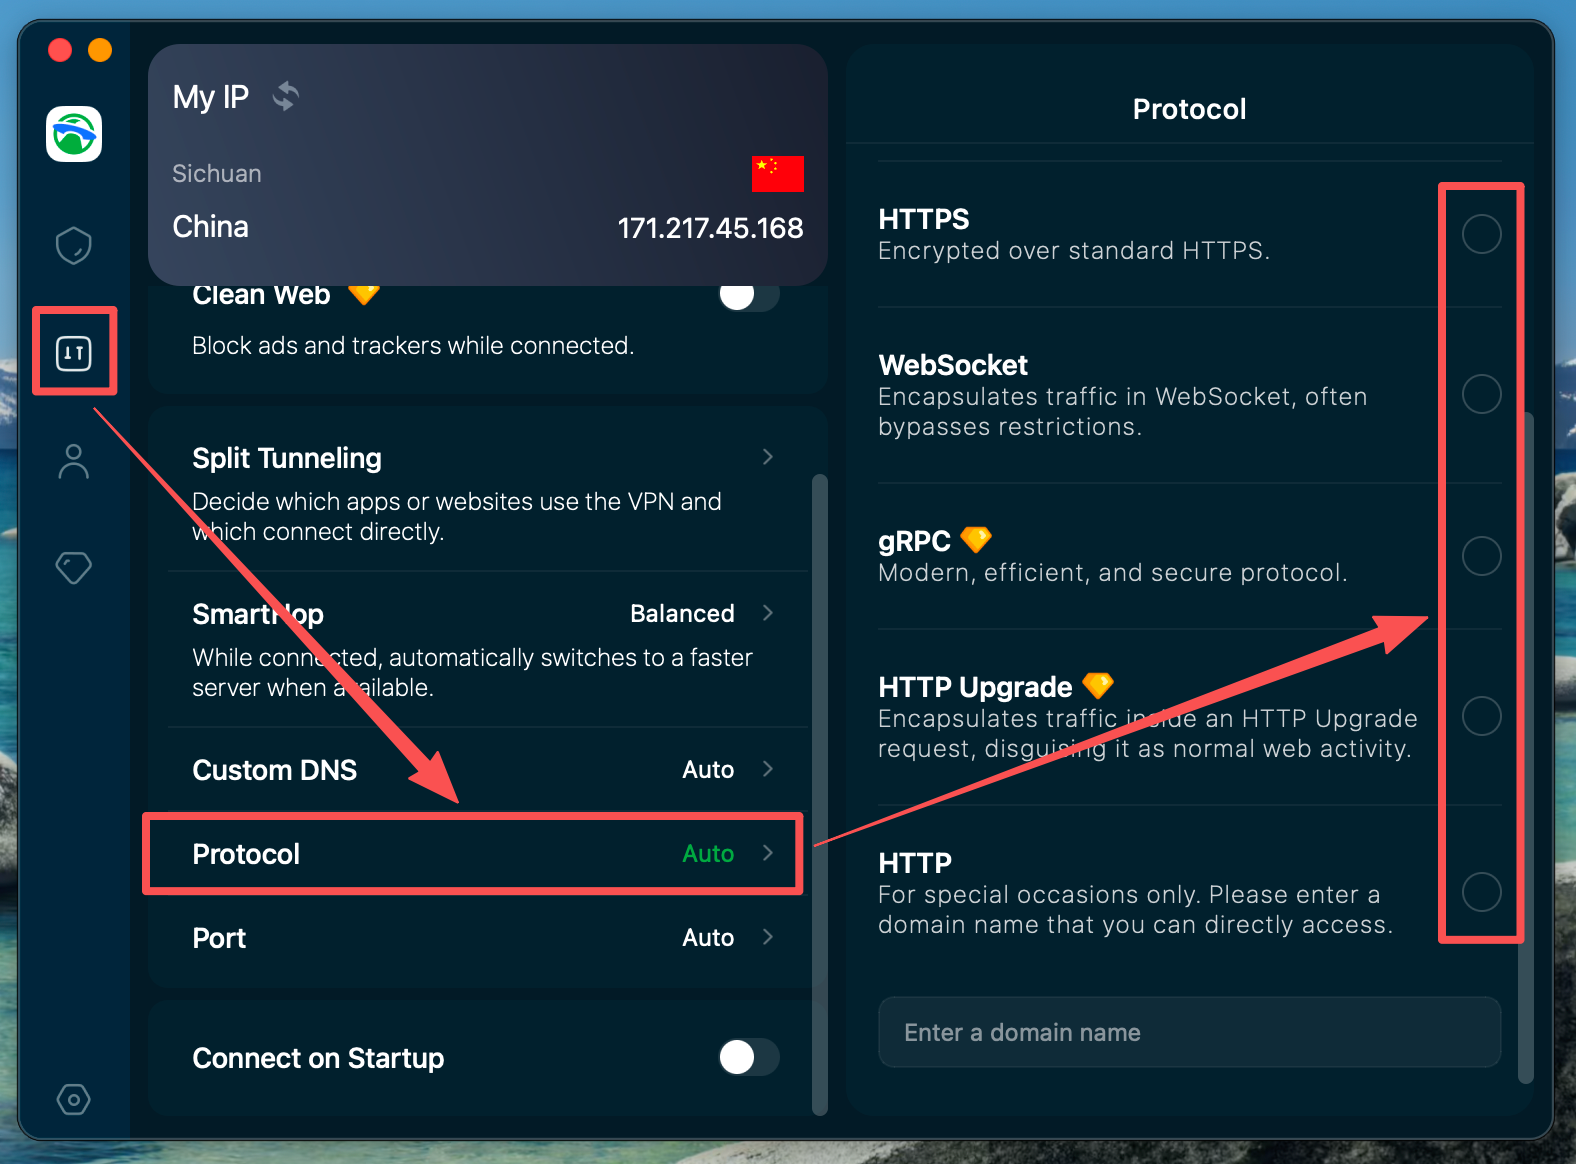
In UFO VPN for Mac, the protocol setting is available directly inside the app:
- Open UFO VPN on your Mac.
- Click Settings in the left sidebar.
- Find Protocol in the settings panel.
- Click the current protocol to open the selection menu.
- Choose the connection option you want to use.
- Reconnect the VPN if needed for the change to take effect.
If you don't have a specific reason to change it, you can keep Auto selected and let UFO VPN choose an appropriate connection option automatically.
This approach is considerably simpler than manual macOS configuration because the VPN app already knows how to communicate with its servers—you don't need to enter IP addresses, certificates, or other connection details yourself.
Method 3: Use a VPN Protocol macOS Doesn't Support
What if the protocol you want doesn't appear in macOS System Settings?
You can't add an unsupported VPN protocol simply by entering a server address. Some piece of software on the Mac must actually implement the protocol. Apple handles custom third-party VPN solutions through technologies such as the Network Extension framework, which allows VPN developers to provide connection methods beyond Apple's built-in choices.
For regular users, there are several realistic options.
Option 1: Use a VPN Client with the Dedicated Protocol
The easiest solution for a standard protocol such as OpenVPN or WireGuard is to install software designed specifically to use it.
For OpenVPN, you normally receive an .ovpn profile from your VPN provider or network administrator. The file contains the server and connection information needed by an OpenVPN-compatible client.
WireGuard works similarly. You need a WireGuard configuration containing the appropriate keys, endpoint, routes, and related settings, then use software capable of implementing the WireGuard tunnel. WireGuard officially provides a macOS client as well as command-line tools.
Option 2: Set Up a VPN Protocol from Terminal
Some VPN protocols can also be set up through Terminal instead of a graphical VPN app. For example, OpenVPN and WireGuard provide command-line tools that can run a VPN connection using the configuration provided by your VPN service or server administrator.
However, this method requires installing command-line software, working with configuration files, and entering commands manually. It's usually too technical for users without command-line experience, so we won't go through the full setup here. If you simply want to use OpenVPN, WireGuard, or another non-native protocol on your Mac, a compatible VPN app or dedicated client is generally the easier option.
Using Terminal also doesn't make the protocol native to macOS. It simply uses command-line software instead of a graphical app to create the VPN connection.
Option 3: Use a Provider-Specific Custom VPN Protocol
Some VPN providers use their own protocols, transports, or connection technologies instead of relying only on IKEv2, OpenVPN, or WireGuard. Whether you can use one of these without the provider's official Mac app depends entirely on what the provider makes available.
You would normally need at least one of the following:
- a compatible standalone client
- a downloadable configuration file
- a public protocol implementation
- a command-line tool
- documentation explaining how third-party clients can connect
If none of those are provided, you generally can't reproduce the provider's custom connection simply by entering values in macOS System Settings.
A configuration file alone also does not magically teach macOS a new VPN protocol—the operating system still needs software capable of implementing the connection.

Which VPN Protocol Should You Use on Mac?
There is no single protocol that is ideal for every Mac user. The better choice depends on whether you're prioritizing speed, compatibility, native macOS support, or a particular VPN server.
Common VPN Protocol Types for Mac
| Protocol | Main Characteristic | Typical Mac Setup |
|---|---|---|
| IKEv2/IPSec | Stable and good at handling network changes | Native macOS setup |
| OpenVPN | Flexible and widely supported | Client or CLI |
| WireGuard | Lightweight, modern design | Client or CLI |
| L2TP/IPSec | Older protocol mainly useful for legacy compatibility | Native macOS setup |
| Provider-specific options | Optimized for a particular VPN service or network situation | Usually inside the VPN app |
Apple's current platform documentation lists MOBIKE support for IKEv2, which helps the connection adapt when the underlying network changes.
It's also worth remembering that a VPN app's Protocol menu may contain a mix of standard VPN protocols, proprietary protocols, and transport methods. They are not necessarily identical technologies even though the app presents them under the same setting.
How to Choose a VPN Protocol on Mac
For most users, the decision can stay simple.
Not sure which one to choose? → Use Auto.
If your VPN app can automatically choose a connection method, this is usually the easiest starting point.
Want a modern, lightweight option? → Consider WireGuard.
It is widely used when performance and a relatively simple protocol design are priorities.
Need broad VPN compatibility? → OpenVPN is often useful.
It's supported by many VPN services and works with portable .ovpn configurations.
Don't want to install an additional VPN client? → Use a native macOS option such as IKEv2.
This works when your VPN server supports it and provides the required credentials.
Your current VPN won't connect on a certain network? → Try another available protocol or transport.
Some managed Wi-Fi networks handle certain connection methods differently, so switching may improve compatibility.
Connecting to a company or school VPN? → Follow the administrator's configuration.
In that case, the correct protocol isn't a personal preference; it needs to match the organization's VPN server.
Why Can't You Change or Enable a VPN Protocol on Mac?
If a VPN protocol doesn't appear or won't connect, the problem usually falls into one of four categories.
1. The protocol isn't supported by macOS.
OpenVPN and WireGuard, for example, don't appear as built-in choices under Apple's standard Add VPN Configuration menu. You'll need compatible software instead.
2. Your VPN provider doesn't offer it.
Your Mac being capable of using a protocol doesn't mean every VPN service supports it. You can only connect if the server side supports the same connection method.
3. You're missing the required configuration.
OpenVPN may require an .ovpn file, WireGuard needs a valid tunnel configuration, and IKEv2 may require server IDs, certificates, or authentication credentials.
4. The VPN app or its network extension isn't working correctly.
Custom VPN apps may rely on Apple's networking frameworks to create and manage the tunnel. If the required VPN configuration or extension isn't properly installed or authorized, the connection may fail. Apple specifically provides its Network Extension framework for third-party VPN and networking solutions.
If one protocol consistently fails while another works, that doesn't automatically mean something is wrong with your Mac. The issue may simply be compatibility between the protocol, VPN server, and current network.
How to Check If Your VPN Protocol Is Working on Mac
After changing a protocol, first disconnect and reconnect the VPN so the new setting is actually applied.
Then check three things:
- Make sure the VPN shows Connected.
- Check your public IP address and confirm it reflects the VPN connection rather than your normal network.
- Browse normally for a few minutes and check whether the connection remains stable.
If you changed protocols to improve speed, compare them using the same VPN server and the same network where possible. Otherwise, a different server location or Wi-Fi condition could affect the result more than the protocol itself.
Conclusion
There are three main ways to enable custom VPN protocols on Mac: configure a protocol macOS already supports, change the connection method inside your VPN app, or install a compatible implementation for protocols that macOS doesn't support natively.
For most users, the VPN app route is the simplest. If you don't have a specific protocol requirement, leaving Auto enabled is usually enough; manual protocol selection becomes useful when you're troubleshooting connection problems or working with a specific VPN server.
FAQs
Can I add OpenVPN directly to macOS VPN settings?
No. OpenVPN isn't available in the standard macOS Add VPN Configuration menu. You need an OpenVPN-compatible client or command-line implementation.
Can I add WireGuard directly to macOS VPN settings?
No. WireGuard also needs compatible software, such as a WireGuard client or command-line tools.
Can I use a custom VPN protocol without installing another VPN app?
Sometimes. If macOS already supports the protocol, you can configure it directly in System Settings. For a non-native protocol, you still need software that supports it. That can be a command-line tool instead of a graphical VPN app.
Can I have multiple VPN configurations on my Mac?
Yes. macOS can store multiple VPN configurations, so you can keep different server or account setups and connect to the one you need.
Can I use two VPN protocols at the same time?
Normally, one VPN connection uses one protocol at a time. Running multiple VPN tunnels at once is possible in some advanced setups, but it can create routing conflicts and isn't needed for normal VPN use.